 The pleached lime hedge in full summer splendor and below a week ago.
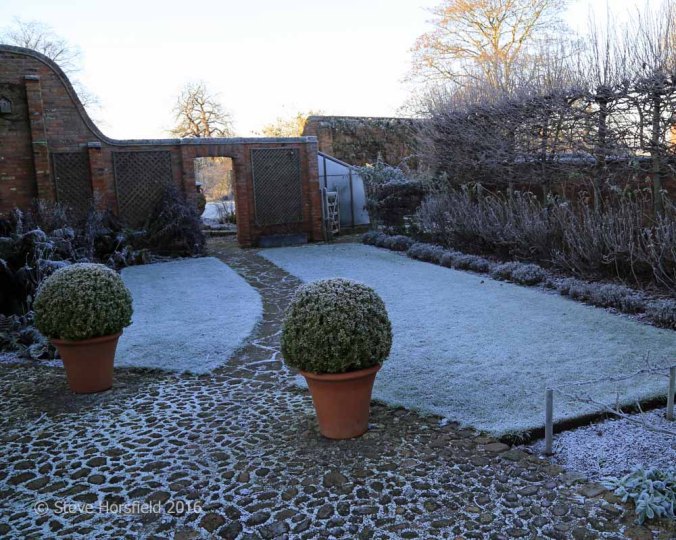
The hedge was planted about 17 years ago as we were developing the structure of the garden. If you get the leaflet from the RHS on pleaching hedges then they suggest putting in metal posts with wires to train the horizontals as they grow. At the time I certainly did not have the time or inclination to set up the wires so I created a frame using bamboo fixed to the trees themselves.
  Each year the hedge was tied in and, as the trees grow, new bamboo layers were fixed in place to train in the new growth.
The lime trees are Tila platyphyllos rubra and are under-planted with Rosa Alfred de Dalmas and Lavandula augustifolia Hidcote together with alliums and lilies. The alliums have been a great success but the lilies are no longer present. The photograph above is about the third summer after planting.
 The hedge above is at the height we have had it for many years. The bamboo frame has more or less rotted away and we think the hedge looks great. .In spring the alliums stand out against the new leaves of the hedge and roses.
 And in summer the roses come into their own. In this photograph there are a lot of allium seed heads which I remove as I have found that leaving them results in far too many alliums the following year.
 Rosa Alfred de Dalmas is a Mossy Damask shrub rose with creamy pink, semi-double cupped flowers with yellow stamens, and a delicate sweet scent that attracts pollinators. It flowers from mid-June to November and benefits from lush foliage and tidy manageable growth. Its moss is greeny pink, turning to russet red on older shoots.
Hedge maintenance
 Once a year there is a significant job to be done to keep the border looking good.
  First the roses are cut back and any dead wood is removed. The vertical bamboo are a relatively new addition. I have planted a range of clematis that are designed to grow into the hedge to give late summer interest. It is early days but it seems to work. The clematis are Clematis Blue Angel, Clematis Perle d’Azur and Clematis Ville de Lyon.
 The side of the hedge facing the lawn together with the top is then cut. I find it is best to do this with secateurs either reducing the shoots to a single bud or weaving the shoot into the structure as required.
 Almost complete, just the cuttings to shred ready for the compost!
 The finished hedge. A once a year job but it is worth it giving a unique pleached lime hedge.
 Technically the hedge is not a traditional pleached lime hedge which would have very distinct horizontals.
  However, take a look at the pruned hedge and you can see that it creates an enormous amount of winter interest and makes an effective hedge.
| Gardening Hours | ||
| This week | Total since June 19th | Average per week |
| 15 | 498 | 17 |

Fantastic, I love it. Your hedge is not just an attractive part of the design, it’s also a great example of the actual art of horticulture. Nice that it is perfectly straight, sometimes the plants do not cooperate!
What’s happening at the end near the house? It looks as if more plants are undergoing training.
LikeLiked by 1 person
Many thanks. Getting it straight reflects many hours of good pruning. If I am right the plants at the end (actually next to an old pig sty) are a row of three double-U pear trees.
LikeLike
Wow what a lot of work but it looks great. Hides the buildings behind nicely also as right height.
LikeLiked by 1 person
Thanks. Actually our neighbour likes it too as it give them privacy
LikeLike
I love it; it is something I’ve always wanted to do but have never been brave enough to try, one day, maybe!
You’ve done a great job with the pruning, it looks perfect to me.
LikeLiked by 1 person
Thanks Christina. We like it too and I thought it would make a good blog.
LikeLiked by 1 person
Yes, an excellent post!
LikeLike
What a beautiful hedge. You make it seem quite simple, although no doubt it is hard work to keep it looking this good.
LikeLiked by 1 person
Many thanks. It is hard work but only once a year.
LikeLiked by 1 person
What a beautiful hedge! I particularly love that last winter photo, which shows it like a basketry artwork… I’ve only seen young, whippety pleached hedges so it’s great to see how they become really interesting, and useful, as winter screening when older.
LikeLiked by 1 person
Thanks. A lot of people have said that it looks amazing in winter
LikeLike
Beautiful and inspiring (even a shade awe-inspiring!) as I’m struggling to create a very simple rosemary hedge… hedging always being one of my bugbears Yours clearly proves what a worthwhile element in the garden though!
LikeLiked by 1 person
Well I guess rosemary would be a bit of a challenge. We do have quite a few hedges in the garden as you can see from some of the other blogs eg https://glebehouse.wordpress.com/2016/08/06/hedges-hedges-hedges/ and https://glebehouse.wordpress.com/2016/09/24/more-hedges-and-wild-life/
LikeLiked by 1 person
It’ s stunning, I love it. What a lovely winter feature it is too. All that hard work really pays off. I love the roses in front.
LikeLiked by 1 person
Many thanks Chloris. It is great that when you get a planting plan right it will keep going for ever.
LikeLike
What an excellent and well illustrated post. Your beautiful hedges are very inspiring, Steve.
LikeLiked by 1 person
Thanks Kate. Not many people have the opportunity for such a hedge. I am very lucky.
LikeLike
Magnificent Steve. You must be very proud and I’m very jealous. D
LikeLiked by 1 person
Thanks David
LikeLike
Reminds me of basketry. Really beautiful. I love it in all seasons. Thanks for sharing info on how it’s achieved.
LikeLiked by 1 person
Thanks Karen. As you know I always like to talk about that hedge!
LikeLike
An interesting account; I think the structure you’ve created is very much in keeping with traditional uses of pleached hedging; the more formal use of verticals & horizontals makes sense in their original grand settings (ie:Versailles/Notre) where the form is what matters. I did some research into pleaching & wrote a couple of posts about our allotment hedging – weaving the young branches is a very satisfying process, even if it takes time. It’s lovely to see a process evolve over time, through care & skill.
LikeLiked by 1 person
Pingback: Garden Bloggers’ Foliage Day – April 2017 | Glebe House Garden
Pingback: End of Month View – March 2018 | Glebe House Garden
Great blog post 🙂
I wonder if you could post a picture of the Clematis under the limes, in bloom?
LikeLiked by 1 person
Thanks Shane. I really must find more time to do some more blogs. Clematis can take a long time to get going and each year we are getting larger plants. I will look for a photo.
LikeLike
Do you know I cannot find a photo! You will have to wait until next summer!!
LikeLike
Hi Steve
Approximately when, each year, does the lime hedge leaf out?
Also, when in winter do you typically trim it?
LikeLiked by 1 person
The leaf is just coming out now. Probably a bit late due to the recent cold weather. I try to cut it in November/ December time after the leaves have dropped. However, sometimes this is in January/February depending on what else I an doing.
I cut it using secateurs which give clean cuts and if needed you can weave some of the growth into the framework. For this hedge, including cleaning up and shredding the cuttings, takes about one day.
LikeLike